How to create beautiful glowing components on React Native 0.76+

I wanted to try one of the new features introduced in React Native 0.76, which is box-shadow. Evan Bacon told me that it even supports multiple box shadows on Android – pretty exciting!
you can use multiple box shadows on android now
— Evan Bacon 🥓 (@Baconbrix) November 15, 2024
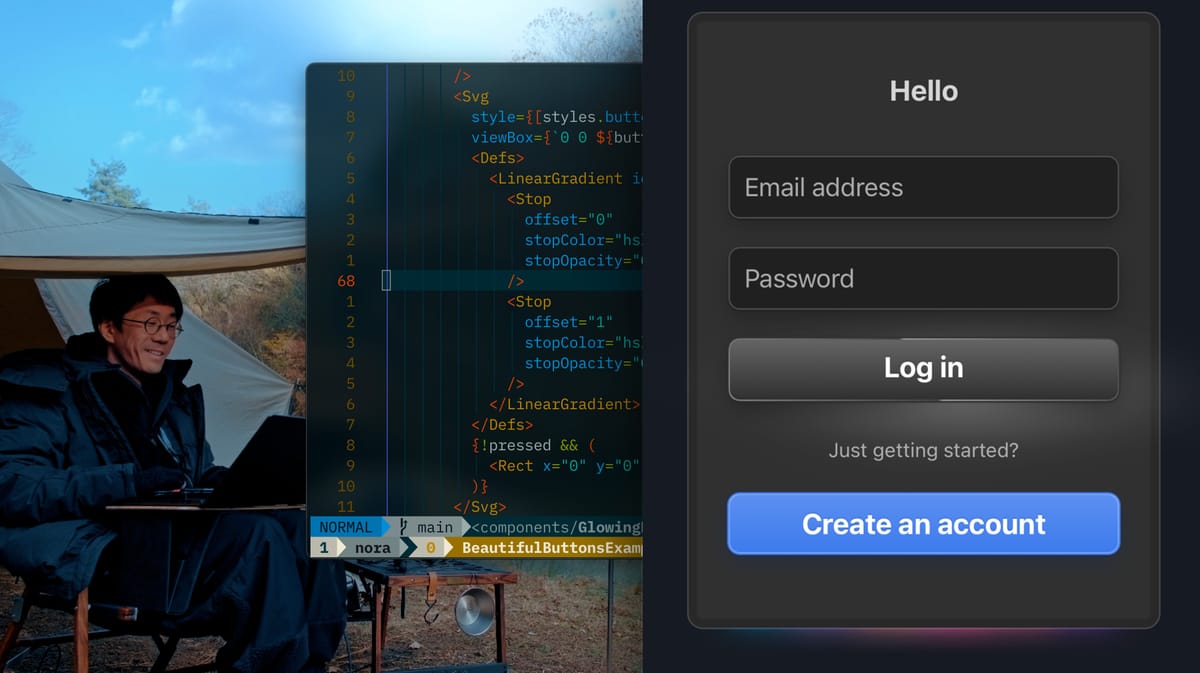
So, in this tutorial, we’ll build a login screen with animated gradient buttons, glowing outlines, and reflective effects using box shadows. We’ll also sprinkle in some slight UI transitions using Moti.
Here is the source code on GitHub:

Video tutorial is available on YouTube:
Ingredients
- Expo – For running our React Native project on iOS, Android, and Web.
- React Native SVG – To create the gradient overlay and mask shapes.
- Moti – Built on top of Reanimated, for simplified animations.
- Reanimated – Required by Moti under the hood for animations.
(In new Expo projects, react-native-gesture-handler and react-native-reanimated are typically installed by default.)
1. Create a New Expo Project
Open your terminal and run:
npx create-expo-app@latest
Follow the prompts to name your project. Then, cd into it:
cd BeautifulButtonsExample
2. Install Dependencies
We need react-native-svg and Moti:
npx expo install react-native-svg
npm install moti --legacy-peer-deps
(If you run into peer dependency issues, using --legacy-peer-deps usually helps.)
3. Project Structure
Below is a minimal directory/file structure for this tutorial:
.
├── app
│   ├── index.tsx
│   └── _layout.tsx
├── components
│   ├── FormInput.tsx
│   ├── GlaringSegment.tsx
│   ├── GlowingButton.tsx
│   ├── GradientButton.tsx
│   ├── InnerReflectionEffect.tsx
│   ├── OuterGlowEffect.tsx
└── ...
4. Main Screen (./app/index.tsx)
import { FormInput } from '@/components/FormInput';
import { GlaringSegment } from '@/components/GlaringSegment';
import { GlowingButton } from '@/components/GlowingButton';
import { GradientButton } from '@/components/GradientButton';
import { MotiView } from 'moti';
import { StyleSheet, SafeAreaView, Text, Image } from 'react-native';

export default function MainScreen() {
  return (
    <SafeAreaView style={styles.container}>
      <MotiView
        style={styles.logoContainer}
        from={{ translateY: 10, opacity: 0 }}
        animate={{ translateY: 0, opacity: 1 }}
        transition={{
          type: 'timing',
          duration: 1200,
          delay: 400,
        }}
      >
        <Image
          source={require('@/components/images/logo.png')}
          resizeMode="contain"
          style={styles.logoImage}
        />
      </MotiView>

      <MotiView
        style={styles.formContainer}
        from={{ translateY: 10, opacity: 0 }}
        animate={{ translateY: 0, opacity: 1 }}
        transition={{
          type: 'timing',
          duration: 1200,
          delay: 800,
        }}
      >
        <GlaringSegment style={styles.segment}>
          <Text style={styles.heading}>Hello</Text>
          <FormInput placeholder="Email address" />
          <FormInput placeholder="Password" secureTextEntry />
          <GlowingButton>Log in</GlowingButton>
          <Text style={styles.text}>Just getting started?</Text>
          <GradientButton style={styles.buttonSignUp}>
            Create an account
          </GradientButton>
        </GlaringSegment>
      </MotiView>
    </SafeAreaView>
  );
}

const styles = StyleSheet.create({
  container: {
    flex: 1,
    backgroundColor: 'hsl(221 20% 11%)',
    justifyContent: 'center',
  },
  heading: {
    opacity: 0.8,
    textAlign: 'center',
    fontSize: 20,
    fontWeight: 'bold',
    color: 'white',
    marginBottom: 24,
  },
  formContainer: {
    flex: 1,
    padding: 12,
  },
  segment: {
    margin: 24,
  },
  buttonSignUp: {
    marginTop: 12,
  },
  text: {
    marginTop: 16,
    color: 'white',
    textAlign: 'center',
    opacity: 0.6,
  },
  logoContainer: {
    marginTop: 60,
    alignItems: 'center',
  },
  logoImage: {
    width: 160,
    height: 160,
  },
});
5. Layout Configuration (./app/_layout.tsx)
This is the root layout where we configure global theme, load fonts, and prevent the splash screen from hiding too soon.
import { DarkTheme, DefaultTheme, ThemeProvider } from '@react-navigation/native';
import { useFonts } from 'expo-font';
import { Stack } from 'expo-router';
import * as SplashScreen from 'expo-splash-screen';
import { StatusBar } from 'expo-status-bar';
import { useEffect } from 'react';
import 'react-native-reanimated';

import { useColorScheme } from '@/hooks/useColorScheme';

SplashScreen.preventAutoHideAsync();

export default function RootLayout() {
  const colorScheme = useColorScheme();
  const [loaded] = useFonts({
    SpaceMono: require('../assets/fonts/SpaceMono-Regular.ttf'),
  });

  useEffect(() => {
    if (loaded) {
      SplashScreen.hideAsync();
    }
  }, [loaded]);

  if (!loaded) {
    return null;
  }

  return (
    <ThemeProvider value={colorScheme === 'dark' ? DarkTheme : DefaultTheme}>
      <Stack>
        <Stack.Screen name="index" options={{ headerShown: false }} />
        <Stack.Screen name="+not-found" />
      </Stack>
      <StatusBar style="auto" />
    </ThemeProvider>
  );
}
6. Form Input (./components/FormInput.tsx)

This is a simple custom TextInput with some styling:
import React from 'react';
import { StyleSheet, TextInput, TextInputProps } from 'react-native';

type Props = TextInputProps;
export const FormInput: React.FC<Props> = (inuptProps) => {
  return (
    <TextInput
      placeholderTextColor="#ffffffa0"
      {...inuptProps}
      style={[styles.container]}
    />
  );
};

const styles = StyleSheet.create({
  container: {
    margin: 10,
    paddingHorizontal: 10,
    height: 44,
    fontSize: 18,
    color: 'white',
    backgroundColor: '#202020',
    borderWidth: 1,
    borderColor: 'hsla(0, 0%, 100%, 0.2)',
    borderRadius: 8,
    boxShadow: `
      0 1px 2px 0 rgba(0, 0, 0, 0.22),
      0 6px 16px 0 rgba(0, 0, 0, 0.22)
    `,
  },
});
7. Glaring Segment (./components/GlaringSegment.tsx)

A kind of “card” container with a colorful shining footer:
import React, { PropsWithChildren } from 'react';
import { StyleProp, StyleSheet, View, ViewStyle } from 'react-native';

type Props = PropsWithChildren<{
  style?: StyleProp<ViewStyle>;
  contentStyle?: StyleProp<ViewStyle>;
}>;

export const GlaringSegment: React.FC<Props> = ({
  children,
  style,
  contentStyle,
}) => {
  return (
    <View style={[styles.segmentContainer, style]}>
      <View style={[styles.segment, contentStyle]}>{children}</View>
      <View style={styles.footer}>
        <View style={[styles.bloom, styles.bloomBlue]} />
        <View style={[styles.bloom, styles.bloomPink]} />
        <View style={[styles.bloom, styles.bloomOrange]} />
        <View style={[styles.bloom, styles.bloomPurple]} />
      </View>
    </View>
  );
};

const styles = StyleSheet.create({
  segmentContainer: {},
  segment: {
    zIndex: 1,
    paddingHorizontal: 12,
    paddingVertical: 36,
    borderWidth: 6,
    borderColor: '#282828',
    borderRadius: 10,
    backgroundColor: '#303030',
    boxShadow: '0 0 0 1 rgba(255, 255, 255, 0.2)',
  },
  footer: {
    overflow: 'hidden',
    zIndex: 1,
    width: '100%',
    height: 100,
  },
  bloom: {
    position: 'absolute',
    height: 1,
    borderRadius: 10,
  },
  bloomBlue: {
    left: '10%',
    width: '40%',
    marginTop: -16,
    boxShadow: `
      0 0px 20px 3px hsl(199 89% 48%),
      0 0px 30px 4px hsl(199 89% 48%)
    `,
  },
  bloomPink: {
    left: `${Math.round(10 + 40 / 3)}%`,
    width: '40%',
    marginTop: -16,
    boxShadow: `
      0 0px 20px 3px hsl(330 81% 60%),
      0 0px 30px 4px hsl(330 81% 60%)
    `,
  },
  bloomOrange: {
    left: `${Math.round(10 + (40 / 3) * 2)}%`,
    width: '40%',
    marginTop: -16,
    boxShadow: `
      0 0px 20px 3px hsl(25 95% 53%),
      0 0px 30px 4px hsl(25 95% 53%)
    `,
  },
  bloomPurple: {
    left: `${10 + 40}%`,
    width: '40%',
    marginTop: -16,
    boxShadow: `
      0 0px 20px 3px hsl(271 91% 65%),
      0 0px 30px 4px hsl(271 91% 65%)
    `,
  },
});
8. Gradient Button (./components/GradientButton.tsx)

This uses an SVG <Rect> and <LinearGradient> to apply a vertical “shine” overlay. We measure the width/height using the new unstable_getBoundingClientRect.
How Svg Gradients Work
- Defs & LinearGradient: In the
<Svg>component, we create a<Defs>section where we define a<LinearGradient>with an ID. We specify the gradient direction usingx1, y1, x2, y2. - Using the gradient: We give the gradient an ID (e.g.,
"grad") and then reference it in the<Rect>fill asfill="url(#grad)". This tells the rectangle to use that gradient definition for its fill color.
import React, {
  PropsWithChildren,
  useLayoutEffect,
  useRef,
  useState,
} from 'react';
import {
  StyleSheet,
  Text,
  Pressable,
  View,
  GestureResponderEvent,
  StyleProp,
  ViewStyle,
} from 'react-native';
import Svg, { Defs, LinearGradient, Rect, Stop } from 'react-native-svg';

type ButtonProps = PropsWithChildren<{
  onPress?: (event: GestureResponderEvent) => void;
  style?: StyleProp<ViewStyle>;
}>;

export const GradientButton: React.FC<ButtonProps> = ({
  children,
  style,
  onPress,
}) => {
  const [pressed, setPressed] = useState<boolean>(false);
  const [buttonWidth, setButtonWidth] = useState<number>(100);
  const [buttonHeight, setButtonHeight] = useState<number>(100);
  const refContainer = useRef<View>(null);

  useLayoutEffect(() => {
    if (refContainer.current) {
      // @ts-ignore
      const { width, height } =
        refContainer.current.unstable_getBoundingClientRect();
      setButtonWidth(width);
      setButtonHeight(height);
    }
  }, []);

  const handlePressIn = () => setPressed(true);
  const handlePressOut = () => setPressed(false);

  return (
    <View style={style}>
      <Pressable
        style={styles.button}
        ref={refContainer}
        onPressIn={handlePressIn}
        onPressOut={handlePressOut}
        onPress={onPress}
      >
        {/* Gradient overlay */}
        <Svg
          style={[styles.buttonSvg, { width: buttonWidth, height: buttonHeight }]}
          viewBox={`0 0 ${buttonWidth} ${buttonHeight}`}
        >
          <Defs>
            <LinearGradient id="grad" x1="0" y1="0" x2="0" y2="1">
              <Stop offset="0" stopColor="hsla(0, 0%, 100%, 0.16)" stopOpacity="0.16" />
              <Stop offset="1" stopColor="hsla(0, 0%, 100%, 0)" stopOpacity="0.0" />
            </LinearGradient>
          </Defs>
          {!pressed && (
            <Rect x="0" y="0" width="100%" height="100%" fill="url(#grad)" />
          )}
        </Svg>
        <Text style={[styles.buttonTitle]}>{children}</Text>
      </Pressable>
    </View>
  );
};

const styles = StyleSheet.create({
  button: {
    position: 'relative',
    overflow: 'hidden',
    margin: 10,
    padding: 0,
    backgroundColor: '#3d7aed',
    borderRadius: 8,
    borderWidth: 1,
    borderColor: 'hsla(0, 0%, 100%, 0.3)',
    boxShadow: `
      0 0 0 1px #3d7aed,
      0 1px 2px 0 rgba(12, 43, 100, 0.32),
      0 6px 16px 0 rgba(12, 43, 100, 0.32)
    `,
  },
  buttonTitle: {
    color: 'white',
    textAlign: 'center',
    fontWeight: 'bold',
    fontSize: 20,
    margin: 8,
    textShadowRadius: 1,
    textShadowOffset: { width: 0, height: -1 },
    textShadowColor: 'hsla(0, 0%, 0%, 0.1)',
  },
  buttonSvg: {
    overflow: 'hidden',
    position: 'absolute',
  },
});
9. Glowing Button (./components/GlowingButton.tsx)

Here we add two extra layers to the button:
- InnerReflectionEffect (rotating swirl)
- OuterGlowEffect (rotating halo behind)
How Moti Rotates the Glow
MotiViewuses Reanimated to smoothly animate therotateproperty from0degto360deg.- We set
loop: trueandduration: 10000to continuously spin the gradient or halo. repeatReverse: falsemeans it won’t reverse direction when it finishes one loop.
import React, {
  PropsWithChildren,
  useLayoutEffect,
  useRef,
  useState,
} from 'react';
import {
  StyleSheet,
  Text,
  Pressable,
  View,
  GestureResponderEvent,
  StyleProp,
  ViewStyle,
} from 'react-native';
import Svg, { Defs, LinearGradient, Rect, Stop } from 'react-native-svg';
import { InnerReflextionEffect } from './InnerReflectionEffect';
import { OuterGlowEffect } from './OuterGlowEffect';

type ButtonProps = PropsWithChildren<{
  onPress?: (event: GestureResponderEvent) => void;
  style?: StyleProp<ViewStyle>;
}>;

export const GlowingButton: React.FC<ButtonProps> = ({
  children,
  style,
  onPress,
}) => {
  const [pressed, setPressed] = useState<boolean>(false);
  const [buttonWidth, setButtonWidth] = useState<number>(100);
  const [buttonHeight, setButtonHeight] = useState<number>(100);
  const refContainer = useRef<View>(null);

  useLayoutEffect(() => {
    if (refContainer.current) {
      // @ts-ignore
      const { width, height } =
        refContainer.current.unstable_getBoundingClientRect();
      setButtonWidth(width);
      setButtonHeight(height);
    }
  }, []);

  const handlePressIn = () => setPressed(true);
  const handlePressOut = () => setPressed(false);

  return (
    <View style={[style, styles.container]}>
      <Pressable
        style={styles.button}
        ref={refContainer}
        onPressIn={handlePressIn}
        onPressOut={handlePressOut}
        onPress={onPress}
      >
        {/* Inner swirl */}
        <InnerReflextionEffect
          width={buttonWidth}
          height={buttonHeight}
          opacity={0.5}
        />

        {/* A subtle gradient mask that appears only when not pressed */}
        <Svg
          style={[
            styles.buttonSvg,
            { width: buttonWidth - 2, height: buttonHeight - 2 },
          ]}
          viewBox={`0 0 ${buttonWidth - 2} ${buttonHeight - 2}`}
        >
          <Defs>
            <LinearGradient id="grad" x1="0" y1="0" x2="0" y2="1">
              <Stop offset="0" stopColor="hsla(0, 0%, 100%, 0.16)" stopOpacity="0.25" />
              <Stop offset="1" stopColor="hsla(0, 0%, 100%, 0)" stopOpacity="0.0" />
            </LinearGradient>
          </Defs>
          {!pressed && (
            <Rect x="0" y="0" width="100%" height="100%" fill="url(#grad)" />
          )}
        </Svg>
        <Text style={[styles.buttonTitle]}>{children}</Text>
      </Pressable>

      {/* Outer halo effect */}
      <OuterGlowEffect width={buttonWidth} height={buttonHeight} opacity={0.8} />
    </View>
  );
};

const styles = StyleSheet.create({
  container: {
    margin: 10,
  },
  button: {
    position: 'relative',
    overflow: 'hidden',
    height: 44,
    padding: 0,
    backgroundColor: '#303030',
    borderRadius: 8,
    boxShadow: `
      0 0 0 1px #303030,
      0 1px 2px 0 rgba(0, 0, 0, 0.32),
      0 6px 16px 0 rgba(0, 0, 0, 0.32)
    `,
  },
  buttonTitle: {
    zIndex: 3,
    color: 'white',
    textAlign: 'center',
    fontWeight: 'bold',
    fontSize: 20,
    margin: 8,
    textShadowRadius: 1,
    textShadowOffset: { width: 0, height: -1 },
    textShadowColor: 'hsla(0, 0%, 0%, 0.1)',
  },
  buttonSvg: {
    overflow: 'hidden',
    position: 'absolute',
    backgroundColor: '#303030',
    borderRadius: 7,
    left: 1,
    top: 1,
    zIndex: 2,
  },
});
10. Inner Reflection Effect (./components/InnerReflectionEffect.tsx)
A swirling “spotlight” inside the button:
import React, { PropsWithChildren } from 'react';
import { StyleSheet, View } from 'react-native';
import Svg, { Defs, LinearGradient, Rect, Stop } from 'react-native-svg';
import { MotiView } from 'moti';
import { Easing } from 'react-native-reanimated';

type ButtonProps = PropsWithChildren<{
  width: number;
  height: number;
  opacity?: number;
}>;

export const InnerReflextionEffect: React.FC<ButtonProps> = ({
  width,
  height,
  opacity,
}) => {
  const glareSize = width * 1.2;
  return (
    <MotiView
      style={[
        styles.positionAbsolute,
        styles.innerBorder,
        {
          top: (height - glareSize) / 2,
          left: (width - glareSize) / 2,
          width: glareSize,
          height: glareSize,
          opacity,
        },
      ]}
      from={{ rotate: '0deg' }}
      animate={{ rotate: '360deg' }}
      transition={{
        loop: true,
        type: 'timing',
        repeatReverse: false,
        duration: 10000,
        easing: Easing.linear,
      }}
    >
      <Svg style={[styles.positionAbsolute]} viewBox={`0 0 ${glareSize} ${glareSize}`}>
        <Defs>
          <LinearGradient id="grad" x1="0" y1="0" x2="0" y2="1">
            <Stop offset="0" stopColor="hsla(0, 100%, 100%, 1)" stopOpacity="1" />
            <Stop offset="0.49" stopColor="hsla(0, 100%, 100%, 1)" stopOpacity="0.2" />
            <Stop offset="0.5" stopColor="hsla(0, 100%, 100%, 1)" stopOpacity="1" />
            <Stop offset="1" stopColor="hsla(0, 100%, 100%, 1)" stopOpacity="0.0" />
          </LinearGradient>
        </Defs>
        <Rect x="0" y="0" width="100%" height="100%" fill="url(#grad)" />
      </Svg>
    </MotiView>
  );
};

const styles = StyleSheet.create({
  positionAbsolute: {
    position: 'absolute',
  },
  innerBorder: {
    opacity: 0.5,
    zIndex: 1,
  },
});
Here, the <LinearGradient> changes from white to transparent halfway down the shape, creating a subtle “swirl.” As it rotates, it looks like light is gliding over the button surface.
11. Outer Glow Effect (./components/OuterGlowEffect.tsx)
How “Background Blooms” Work
- We place a large, blurred shape behind the button (zIndex: -1).
- Multiple box-shadow layers create that strong bloom or halo.
- We use
transform: [{ scaleY: 0.3 }]to flatten it in the vertical axis, so it becomes an elongated horizontal glow. - We rotate it continuously via
MotiViewin the same way as the inner swirl.
import React, { PropsWithChildren } from 'react';
import { StyleSheet, View } from 'react-native';
import { MotiView } from 'moti';
import { Easing } from 'react-native-reanimated';

type ButtonProps = PropsWithChildren<{
  width: number;
  height: number;
  opacity?: number;
}>;

export const OuterGlowEffect: React.FC<ButtonProps> = ({
  width,
  height,
  opacity,
}) => {
  const glareSize = width * 1.2;
  return (
    <View
      style={[
        styles.positionAbsolute,
        {
          width,
          height,
          transform: [{ scaleY: 0.3 }],
        },
      ]}
    >
      <MotiView
        style={[
          styles.innerBorder,
          {
            top: (height - glareSize) / 2,
            left: (width - glareSize) / 2,
            width: glareSize,
            height: glareSize,
            opacity,
          },
        ]}
        from={{ rotate: '0deg' }}
        animate={{ rotate: '360deg' }}
        transition={{
          loop: true,
          type: 'timing',
          repeatReverse: false,
          duration: 10000,
          easing: Easing.linear,
        }}
      >
        <View
          style={[
            styles.positionAbsolute,
            styles.bloom,
            {
              left: glareSize / 3,
              top: glareSize / 2,
              width: 1,
              height: 1,
            },
          ]}
        />
      </MotiView>
    </View>
  );
};

const styles = StyleSheet.create({
  positionAbsolute: {
    position: 'absolute',
    zIndex: -1, // behind the button
  },
  innerBorder: {
    opacity: 0.8,
  },
  bloom: {
    borderRadius: 10,
    boxShadow: `
      0 0px 30px 10px rgba(255, 255, 255, 1),
      0 0px 60px 20px rgba(255, 255, 255, 1),
      0 0px 120px 80px rgba(255, 255, 255, 0.5)
    `,
  },
});
12. Running the Project
Once everything is in place, you can start your app:
Android:
$ANDROID_HOME/tools/emulator -list-avds
$ANDROID_HOME/tools/emulator -avd Pixel_8_Pro_API_34
npm run android --deviceId=emulator-5554
iOS:
npm run ios --simulator="iPhone 16 Pro"
How It All Comes Together
- Measuring Button Size
Usingunstable_getBoundingClientRectlets us know the actual width & height of our<Pressable>. This is crucial for properly sizing the SVG<Rect>or the rotating glow.
It is available in the new architecture: New Architecture is here · React Native - SVG + Gradients
In each custom button, an<Svg>element with<Defs>and<LinearGradient>is layered on top (or behind). The<Rect fill="url(#grad)" />uses that gradient to produce a soft fade from white to transparent, giving a “sheen” look. - Animations via Moti
A<MotiView>wraps shapes like the swirl or bloom, rotating them 360° in an infinite loop. Moti simplifies Reanimated usage by letting you specifyfrom={{ rotate: '0deg' }}andanimate={{ rotate: '360deg' }}. - Background Blooms / Halos
Large box-shadows on an absolutely-positioned<View>behind the button create a strong glow. We squash it vertically (scaleY: 0.3) to make it more elliptical.
Conclusion
By layering several Svg gradients and leveraging Moti to animate rotation, you can achieve mesmerizing glow effects in React Native. The key components we introduced:
- GradientButton with a simple gradient overlay.
- GlowingButton featuring:
- InnerReflextionEffect (a swirling highlight)
- OuterGlowEffect (a flattened halo behind the button)
- GlaringSegment container for a shiny “card” feel.
Experiment with different durations, easing functions, and color stops in your gradients to create your own unique style. Happy coding!
Looking for a Markdown note-taking app designed for developers?

Check out my app called Inkdrop


