How to set up Neovim 0.5 + Modern plugins (LSP, Treesitter, Fuzzy finder, etc)
IDE-like features based on LSP and Treesitter, fuzzy finder, and status line
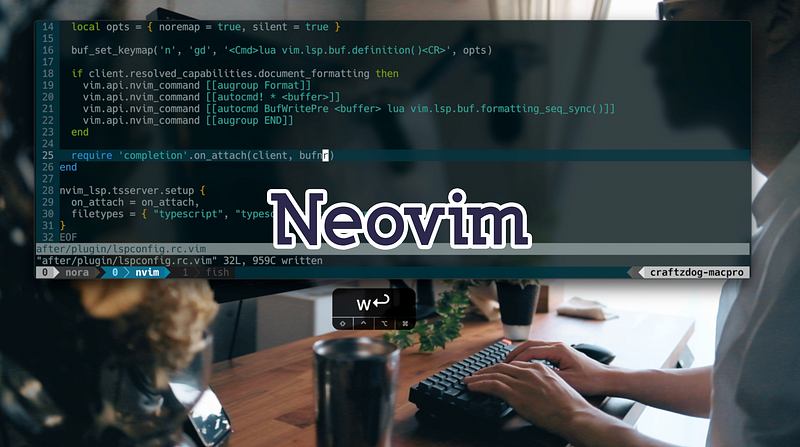
Hi, it’s Takuya. I use Neovim to develop my app called Inkdrop. Recently, I’ve got some updates for my Neovim setup since I’ve published last year. Neovim 0.5, which is nightly at the moment, comes with cool new improvements like Lua remote plugin host, built-in LSP client (yes!), and Treesitter syntax engine. I found there are already a bunch of great plugins that leverage those new nightly features. I tried them, and already love them! Besides, it works pretty well on my M1 MacBook Air, which is awesome. I’d like to introduce my latest setup with Neovim 0.5 and modern plugins. Here is a quick summary of my set up:
- vim-plug — A minimalist Vim plugin manager
- nvim-lspconfig — A collection of configurations for Neovim’s built-in LSP
- nvim-treesitter — Treesitter configurations and abstraction layer for Neovim
- completion-nvim — An auto completion framework based on Neovim’s built-in LSP
- glepnir/lspsaga.nvim — A light-weight LSP plugin based on Neovim built-in LSP with highly a performant UI
- telescope.nvim — A highly extendable fuzzy finder over lists
- lualine.nvim — A blazing fast and easy to configure neovim statusline plugin written in pure lua
And here is my dotfiles repository:

Prerequisites — iTerm2 and Patched Nerd Font
iTerm2 is a fast terminal emulator for macOS. Install one of Nerd Fonts for displaying fancy glyphs on your terminal. My current choice is Hack. And use it on your terminal app. For example, on iTerm2:
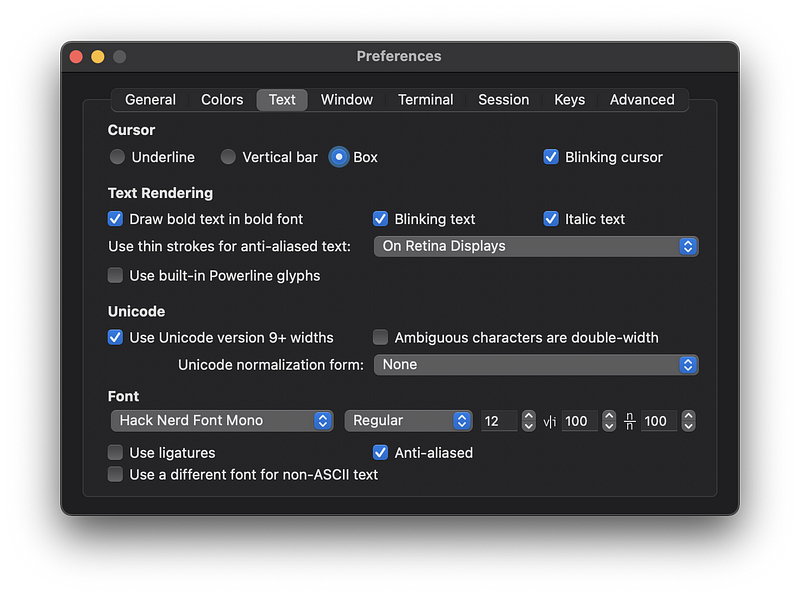
My color theme is NeoSolarized, which is a true color Solarized theme. The Solarized Dark theme for iTerm2 is here.
Install Nightly Neovim (0.5)
The current stable release is 0.4.x. You have to install it from HEAD. With homebrew on macOS:
brew install --HEAD tree-sitter luajit neovimIf you already have them installed, upgarde them by doing so:
brew upgrade --fetch-HEAD tree-sitter luajit neovimDirectory structure
Neovim conforms XDG Base Directory structure. Here is my config file structure:
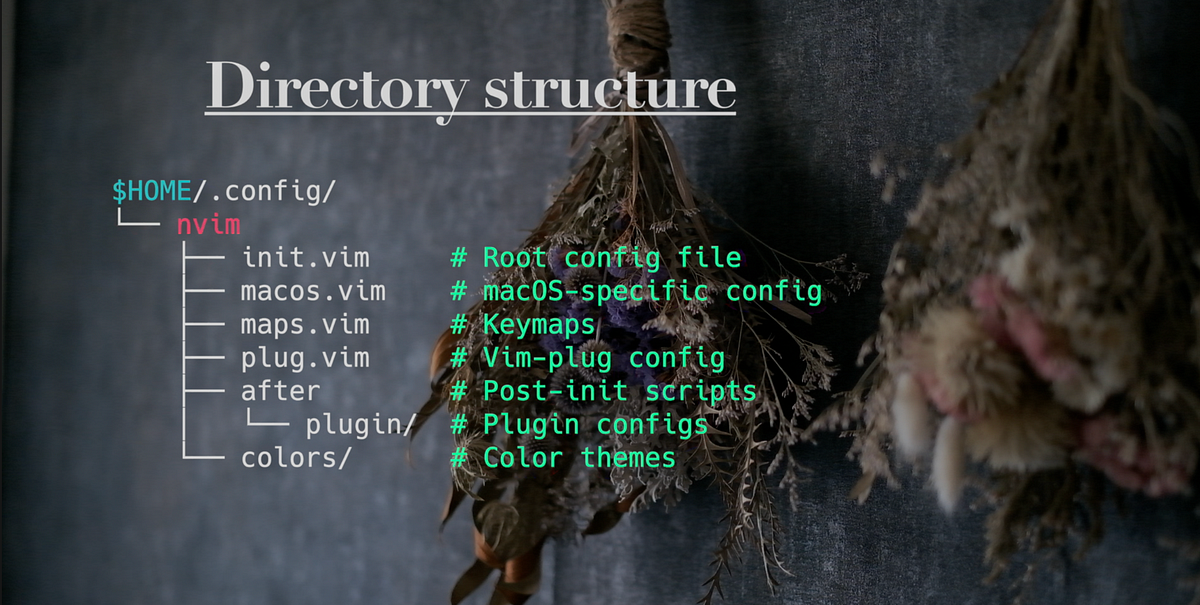
Neovim loads $HOME/.config/nvim/init.vim or init.lua first instead of $HOME/.vimrc. Then, my init.vim loads platform-depended config, keymaps, and plugins.
Install plugin manager: vim-plug
Install vim-plug into $HOME/.local/share/nvim/site/autoload/plug.vim:
sh -c 'curl -fLo $HOME/.local/share/nvim/site/autoload/plug.vim --create-dirs \
       https://raw.githubusercontent.com/junegunn/vim-plug/master/plug.vim'
Then, you can add vim plugins in ~/.local/share/nvim/plugged by doing so:
call plug#begin(stdpath('data') . '/plugged')...call plug#end()I manage plugins in $HOME/.config/nvim/plug.vim. Then, relaunch Neovim and run :PlugInstall to install plugins.
Set up the built-in LSP client
As I mentioned above, Neovim has the built-in language server protocol client. LSP facilitates useful features like:
- go-to-definition
- find-references
- hover
- completion
- rename
- format
- refactor
It lets Neovim behave more like IDE. To enable it, install nvim-lspconfig, which is a collection of common configurations for language servers of each language:
Plug 'neovim/nvim-lspconfig'Note that this plugin is just configurations. You need to set up the language servers for each language you use. Follow CONFIG.md for details.
TypeScript
For example, to set up Typescript language server, install required packages via npm:
npm install -g typescript typescript-language-serverThen, setup with lspconfig in your vim config in lua:
local nvim_lsp = require('lspconfig')
nvim_lsp.tsserver.setup {}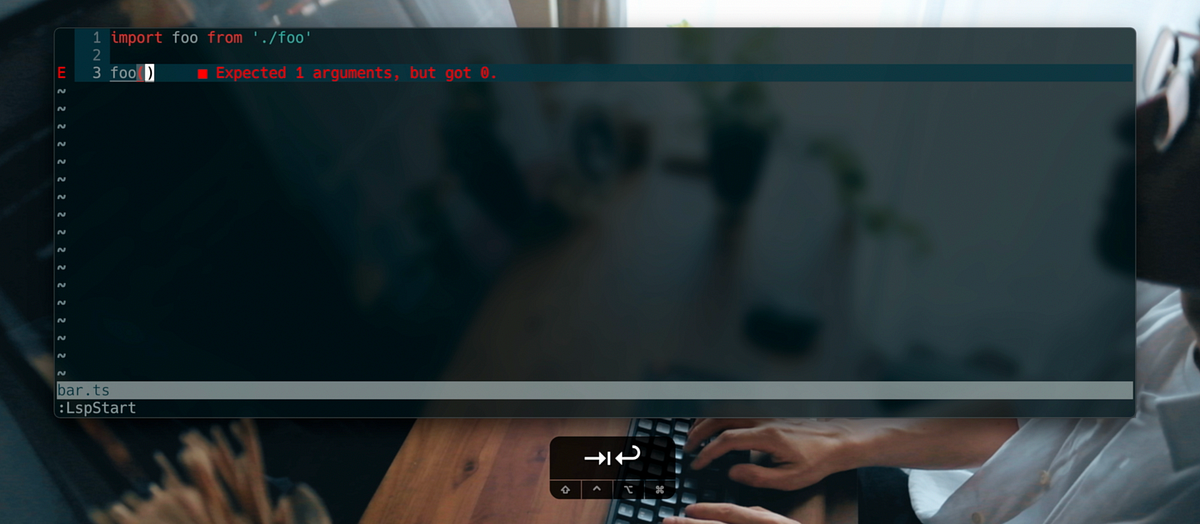
Go-to-definition
You can set keymaps by doing so:
local nvim_lsp = require('lspconfig')local on_attach = function(client, bufnr)
local function buf_set_keymap(...) vim.api.nvim_buf_set_keymap(bufnr, ...) end-- Mappings.
local opts = { noremap=true, silent=true }buf_set_keymap('n', 'gD', '<Cmd>lua vim.lsp.buf.declaration()<CR>', opts)
buf_set_keymap('n', 'gd', '<Cmd>lua vim.lsp.buf.definition()<CR>', opts)
--...
end-- TypeScript
nvim_lsp.tsserver.setup {
on_attach = on_attach
}Type gd in normal mode, then it jumps to the definition. Check out other keybindings here.
Improve LSP UI with lspsaga.nvim
Neovim’s LSP interface is extensible. lspsaga.nvim provides nice UIs for LSP functions. Install it with vim-plug:
Plug 'glepnir/lspsaga.nvim'Enable it:
local saga = require 'lspsaga'```lua
saga.init_lsp_saga {
error_sign = '',
warn_sign = '',
hint_sign = '',
infor_sign = '',
border_style = "round",
}Hover Doc
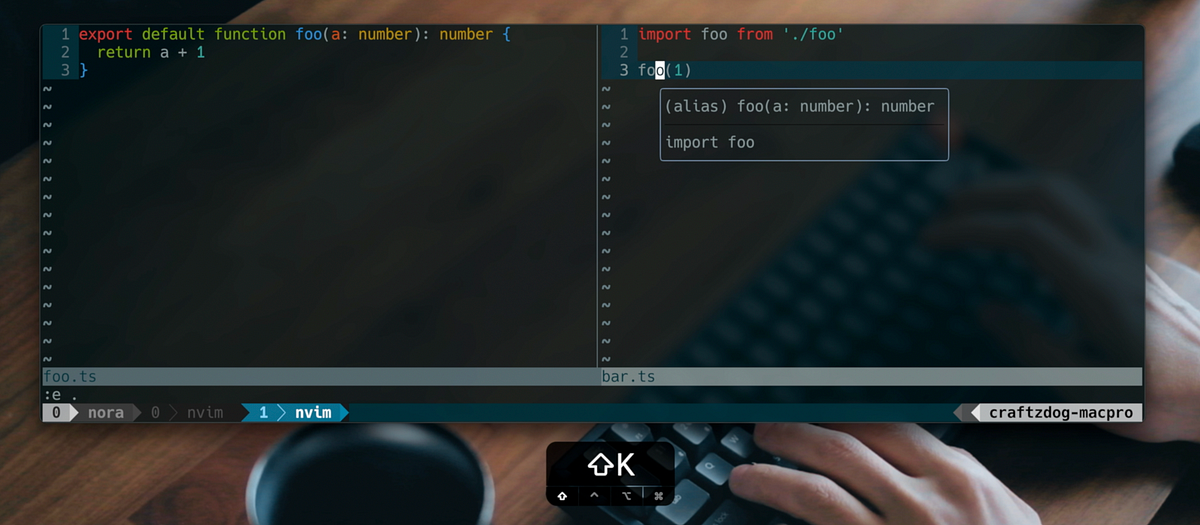
" show hover doc
nnoremap <silent>K :Lspsaga hover_doc<CR>
Signature help
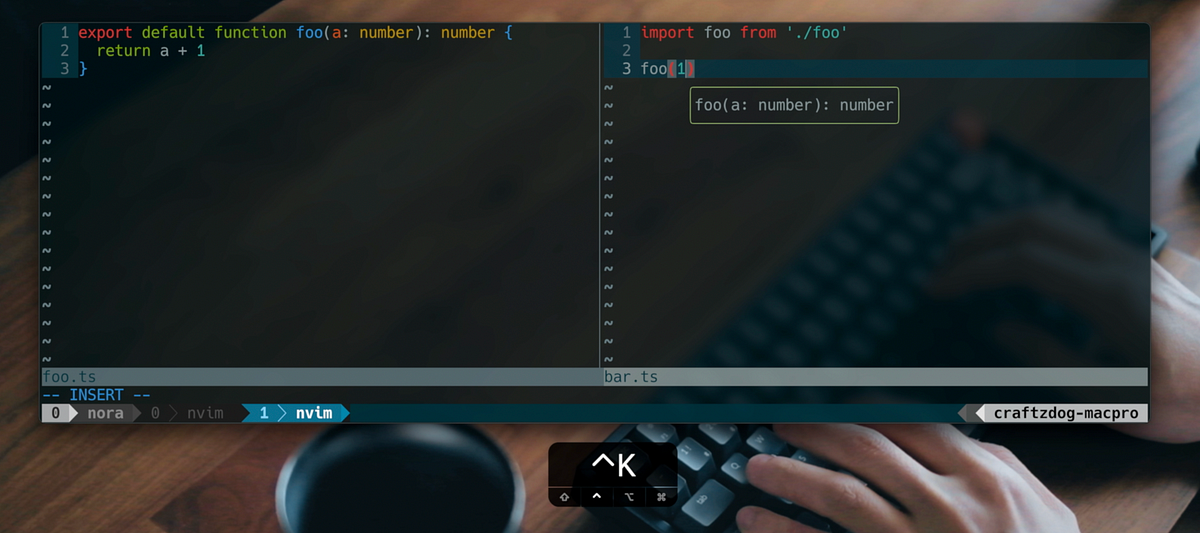
inoremap <silent> <C-k> <Cmd>Lspsaga signature_help<CR>Async LSP Finder
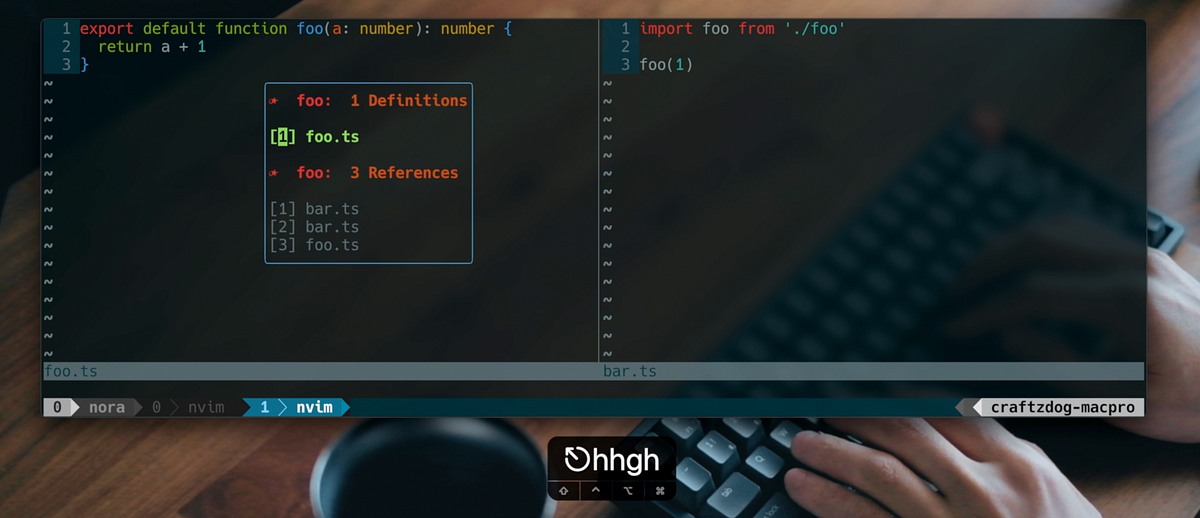
Find the cursor word definition and reference:
nnoremap <silent> gh <Cmd>Lspsaga lsp_finder<CR>Diagnostics
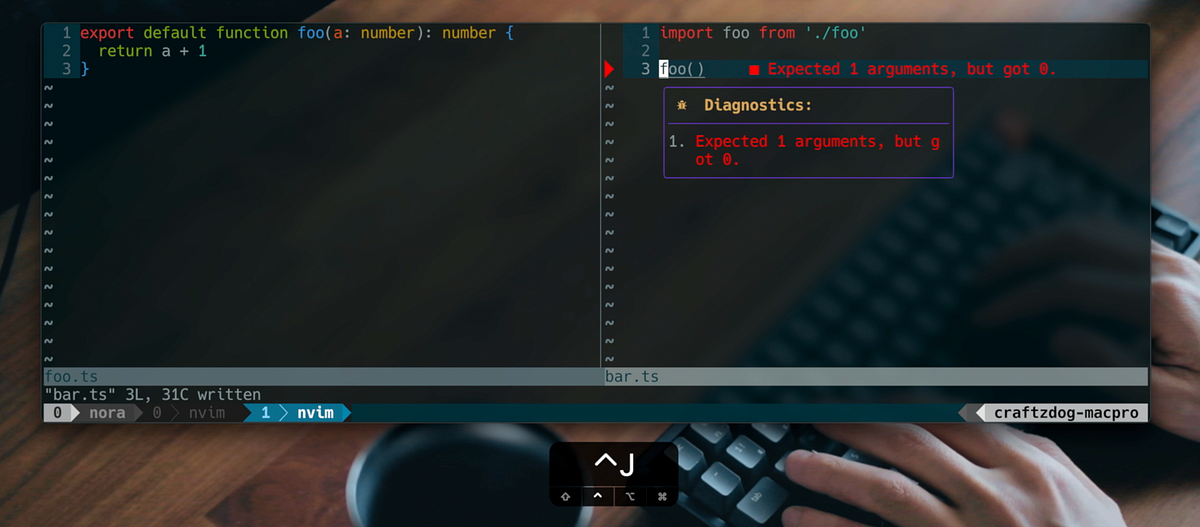
Install diagnostic-languageserver:
npm install -g diagnostic-languageserverAnd configure Neovim LSP like so:
nvim_lsp.diagnosticls.setup {
  -- your configuration
}
Use ESLint and Prettier
Since I often write JavaScript, CSS, LESS, SCSS, and Markdown for my app, I configured diagnosticls to use ESLint and Prettier. To reduce latency when invoking ESLint, I’m gonna use eslint_d, which runs eslint as a daemon process.
Install:npm i -g eslint_d prettier
Config:
nvim_lsp.diagnosticls.setup {
  on_attach = on_attach,
  filetypes = { 'javascript', 'javascriptreact', 'json', 'typescript', 'typescriptreact', 'css', 'less', 'scss', 'markdown', 'pandoc' },
  init_options = {
    linters = {
      eslint = {
        command = 'eslint_d',
        rootPatterns = { '.git' },
        debounce = 100,
        args = { '--stdin', '--stdin-filename', '%filepath', '--format', 'json' },
        sourceName = 'eslint_d',
        parseJson = {
          errorsRoot = '[0].messages',
          line = 'line',
          column = 'column',
          endLine = 'endLine',
          endColumn = 'endColumn',
          message = '[eslint] ${message} [${ruleId}]',
          security = 'severity'
        },
        securities = {
          [2] = 'error',
          [1] = 'warning'
        }
      },
    },
    filetypes = {
      javascript = 'eslint',
      javascriptreact = 'eslint',
      typescript = 'eslint',
      typescriptreact = 'eslint',
    },
    formatters = {
      eslint_d = {
        command = 'eslint_d',
        args = { '--stdin', '--stdin-filename', '%filename', '--fix-to-stdout' },
        rootPatterns = { '.git' },
      },
      prettier = {
        command = 'prettier',
        args = { '--stdin-filepath', '%filename' }
      }
    },
    formatFiletypes = {
      css = 'prettier',
      javascript = 'eslint_d',
      javascriptreact = 'eslint_d',
      json = 'prettier',
      scss = 'prettier',
      less = 'prettier',
      typescript = 'eslint_d',
      typescriptreact = 'eslint_d',
      json = 'prettier',
      markdown = 'prettier',
    }
  }
}
Set keymaps for jump diagnostic and show diagnostics:
nnoremap <silent> <C-j> :Lspsaga diagnostic_jump_next<CR>See more keymaps here.
Custom diagnostic signs
For lspconfig:
-- icon
vim.lsp.handlers["textDocument/publishDiagnostics"] = vim.lsp.with(
vim.lsp.diagnostic.on_publish_diagnostics, {
underline = true,
-- This sets the spacing and the prefix, obviously.
virtual_text = {
spacing = 4,
prefix = ''
}
}
)
Let it format on save
Set an autocommand for BufWritePre to run lua vim.lsp.buf.formatting_seq_sync() on save:
-- Add the below lines to `on_attach`
local on_attach = function(client, bufnr)
  ...

  if client.resolved_capabilities.document_formatting then
    vim.api.nvim_command [[augroup Format]]
    vim.api.nvim_command [[autocmd! * <buffer>]]
    vim.api.nvim_command [[autocmd BufWritePre <buffer> lua vim.lsp.buf.formatting_seq_sync()]]
    vim.api.nvim_command [[augroup END]]
  end
end
Set up tree-sitter for syntax highlightings
Tree-sitter is an incremental language parsing library. Neovim uses it to build syntax tree, in order to understand source code better. As a result, now Neovim provides better highlight (See gallery. To enable it, install nvim-treesitter:
Plug 'nvim-treesitter/nvim-treesitter', {'do': ':TSUpdate'}Then, relaunch Neovim. You have to install parsers for each language. For exmample, you can install JavaScript parser with:
:TSInstall javascriptYou can also get a list of all available languages and their installation status with :TSInstallInfo. By adding languages to ensure_installed, the plugin automatically installs them on initialization:
require'nvim-treesitter.configs'.setup {
  highlight = {
    enable = true,
    disable = {},
  },
  indent = {
    enable = false,
    disable = {},
  },
  ensure_installed = {
    "tsx",
    "toml",
    "fish",
    "php",
    "json",
    "yaml",
    "swift",
    "html",
    "scss"
  },
}
local parser_config = require "nvim-treesitter.parsers".get_parser_configs()
parser_config.tsx.used_by = { "javascript", "typescript.tsx" }Set up auto-completion
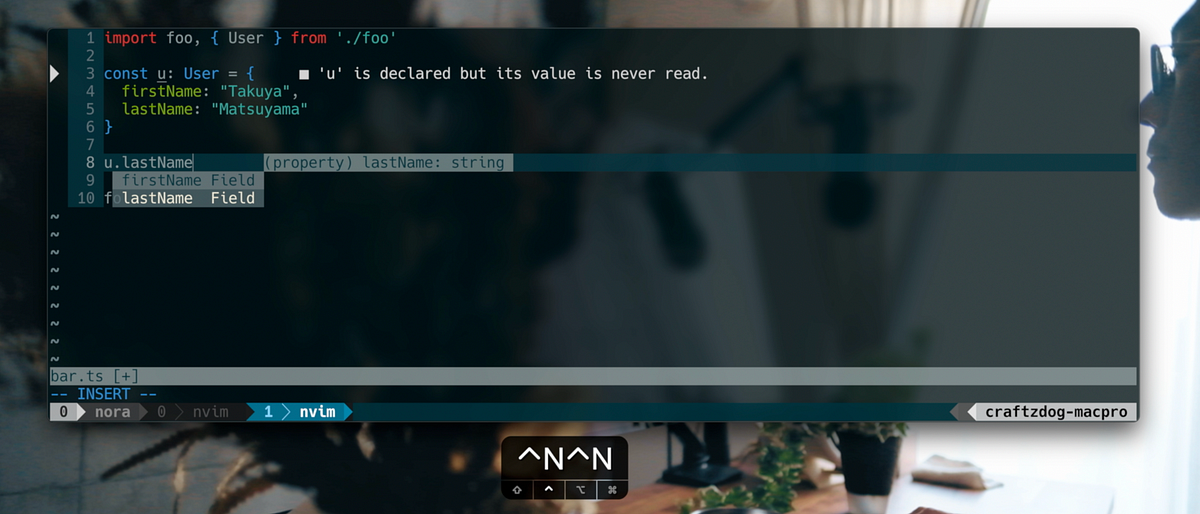
Install completion-nvim:
Plug 'nvim-lua/completion-nvim'You have to enable it in your on_attach handler:
local on_attach = function(client, bufnr)
  ...
  require'completion'.on_attach(client, bufnr)
  ...
end
Here is my preference:
set completeopt=menuone,noinsert,noselect" Use <Tab> and <S-Tab> to navigate through popup menu
inoremap <expr> <Tab> pumvisible() ? "\<C-n>" : "\<Tab>"
inoremap <expr> <S-Tab> pumvisible() ? "\<C-p>" : "\<S-Tab>"If you are using an auto closing plugin like me using lexima.vim, you have to set the below keymap to avoid conflicting the behaviors:
let g:completion_confirm_key = ""
imap <expr> <cr>  pumvisible() ? complete_info()["selected"] != "-1" ?
                 \ "\<Plug>(completion_confirm_completion)"  : "\<c-e>\<CR>" :  "\<CR>"
Custom completion icons
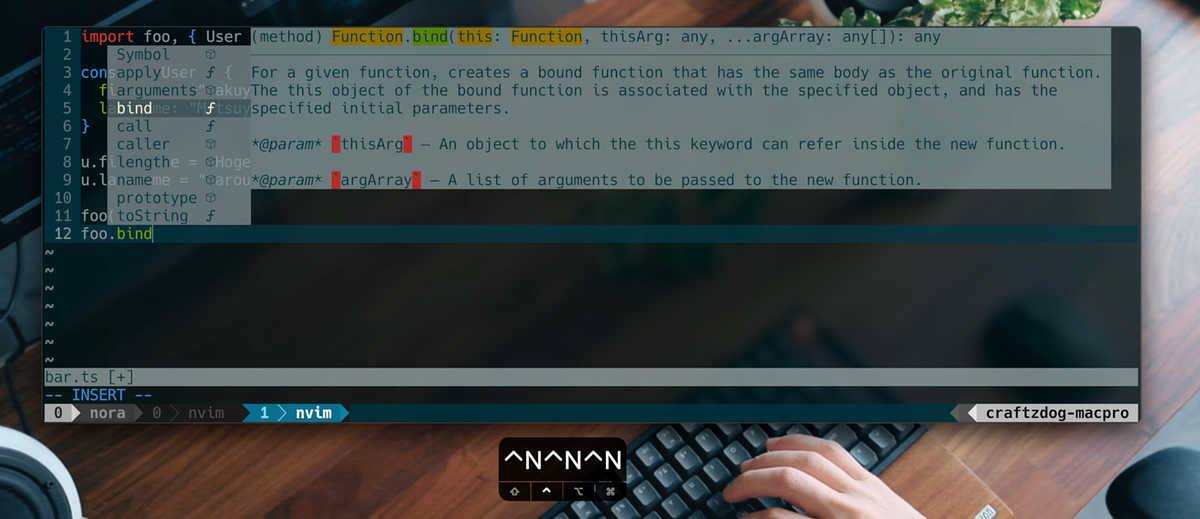
Then, in your nvim-lspconfig config, add the following lines:
local on_attach = function(client, bufnr)
...
protocol.CompletionItemKind = {
'', -- Text
'', -- Method
'', -- Function
'', -- Constructor
'', -- Field
'', -- Variable
'', -- Class
'ﰮ', -- Interface
'', -- Module
'', -- Property
'', -- Unit
'', -- Value
'', -- Enum
'', -- Keyword
'', -- Snippet
'', -- Color
'', -- File
'', -- Reference
'', -- Folder
'', -- EnumMember
'', -- Constant
'', -- Struct
'', -- Event
'ﬦ', -- Operator
'', -- TypeParameter
}
endSet up fuzzy finder using telescope.nvim
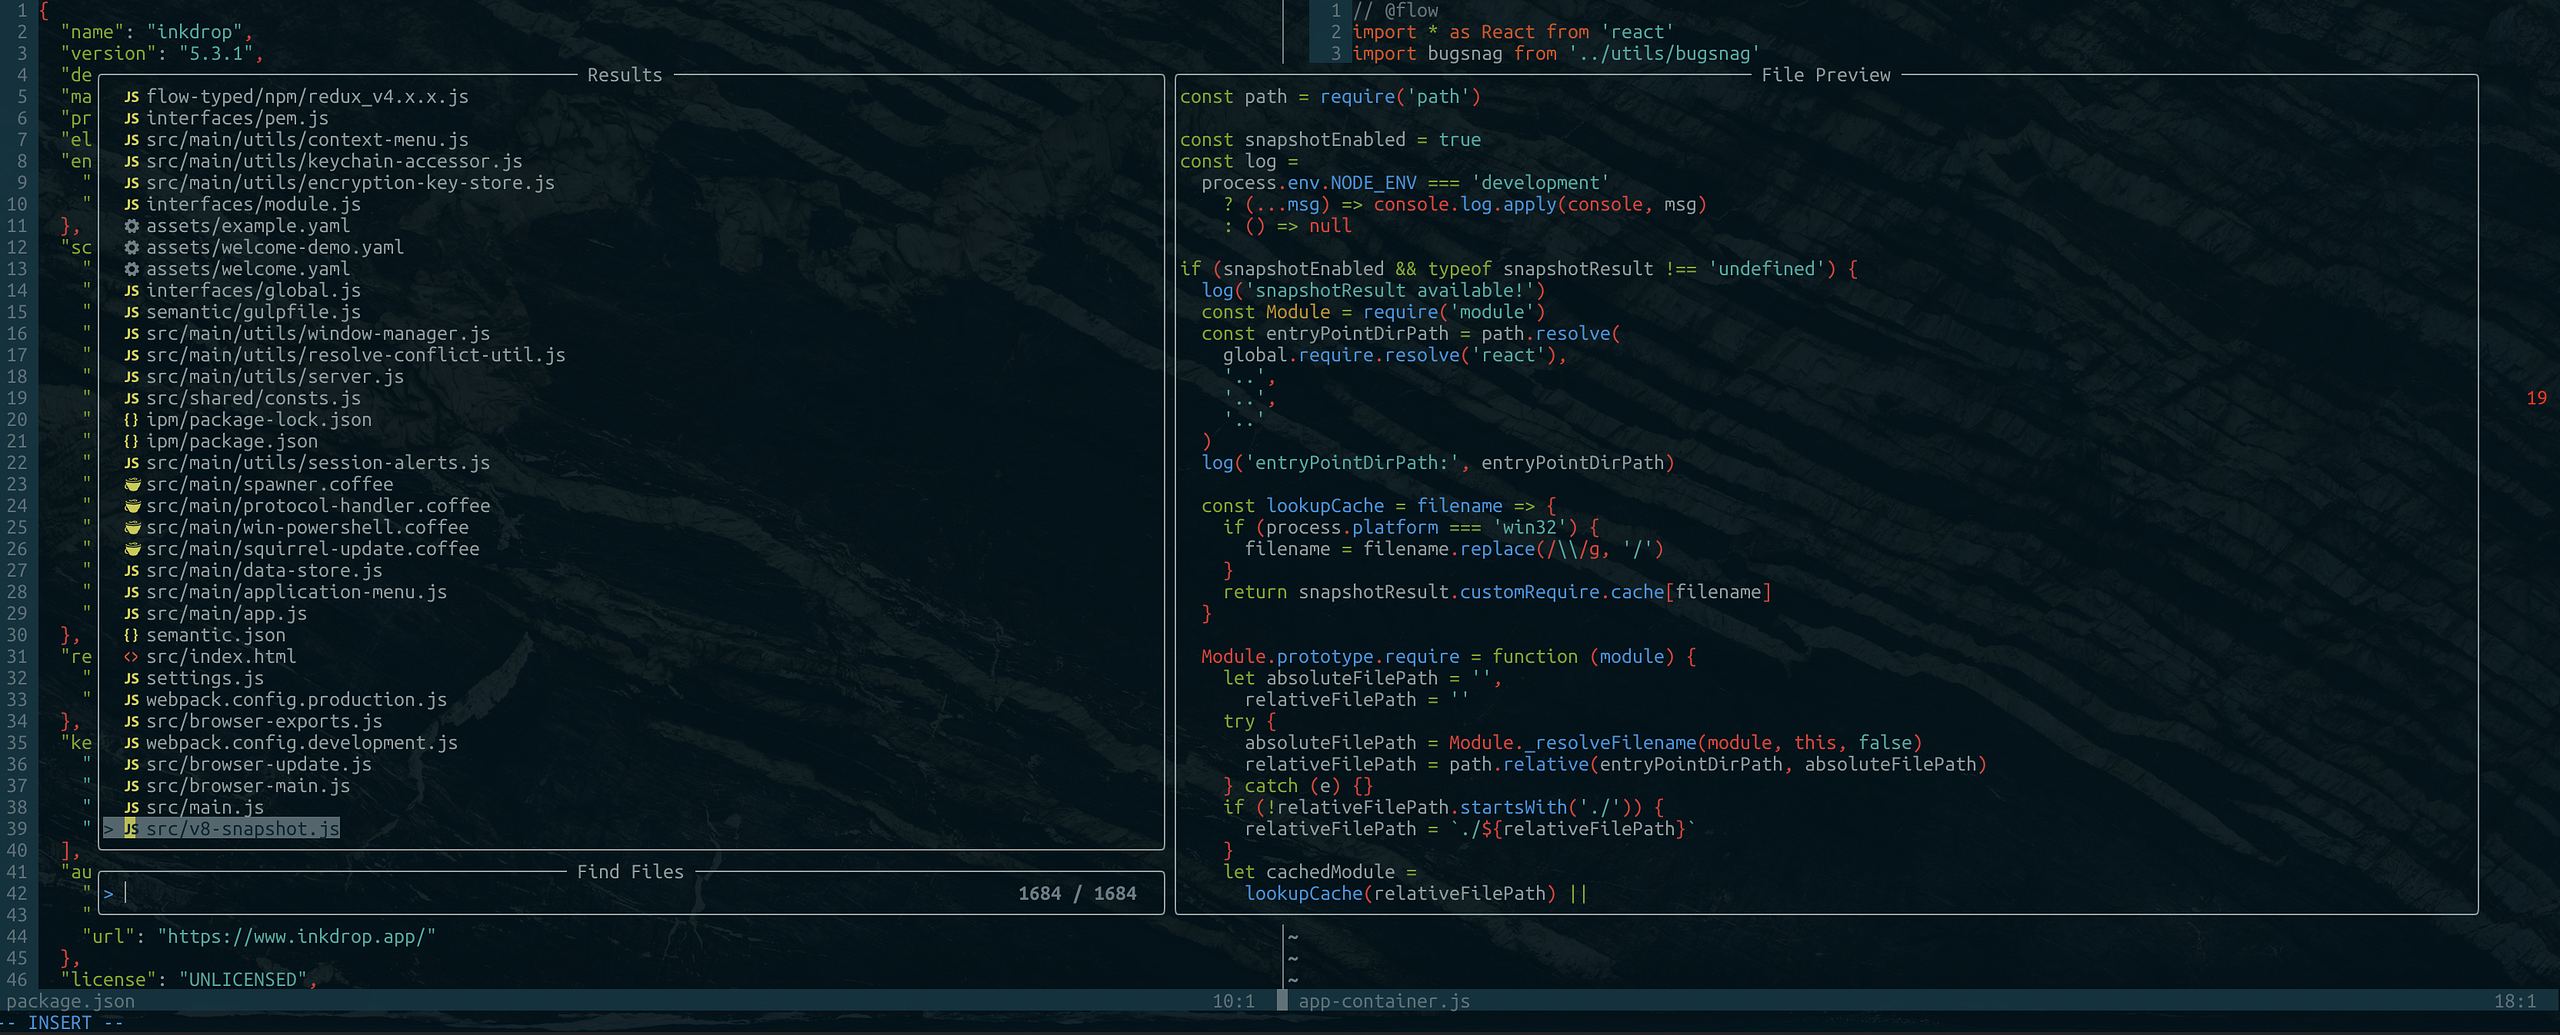
telescope.nvim provides an interactive fuzzy finder over lists, built on top of the latest Neovim features.
It’s so useful because you can search files while viewing the content of the files without actually opening them. It supports various sources like Vim, files, Git, LSP, and Treesitter. Check out the showcase of Telescope.
To install with vim-plug:
Plug 'nvim-lua/popup.nvim'
Plug 'nvim-lua/plenary.nvim'
Plug 'nvim-telescope/telescope.nvim'
My keybindings are:
nnoremap <silent> ;f <cmd>Telescope find_files<cr>
nnoremap <silent> ;r <cmd>Telescope live_grep<cr>
nnoremap <silent> \\ <cmd>Telescope buffers<cr>
nnoremap <silent> ;; <cmd>Telescope help_tags<cr>
And I also map q key to close the window:
local actions = require('telescope.actions')require('telescope').setup{
defaults = {
mappings = {
n = {
["q"] = actions.close
},
},
}
}File icons
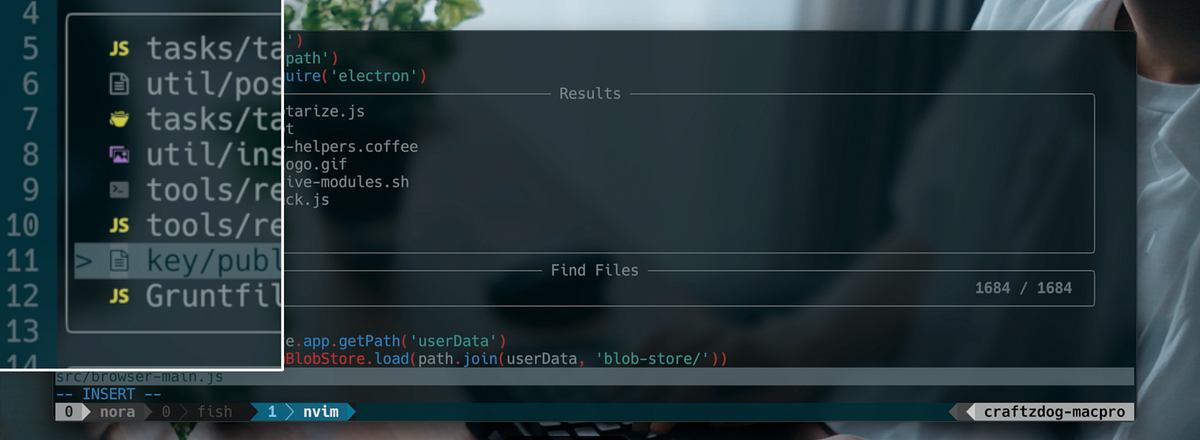
Install nvim-web-devicons, which is a dictionary of file icons:
Plug 'kyazdani42/nvim-web-devicons'Set up status line with lualine.nvim

Install:
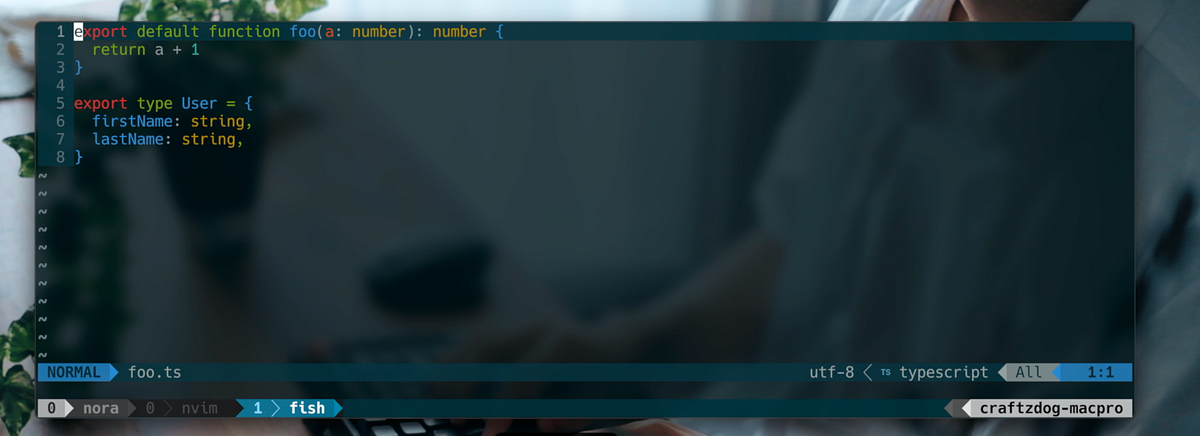
Plug 'hoob3rt/lualine.nvim'My status line set up is:
local status, lualine = pcall(require, "lualine")
if (not status) then return end
lualine.setup {
options = {
icons_enabled = true,
theme = 'solarized_dark',
section_separators = {'', ''},
component_separators = {'', ''},
disabled_filetypes = {}
},
sections = {
lualine_a = {'mode'},
lualine_b = {'branch'},
lualine_c = {'filename'},
lualine_x = {
{ 'diagnostics', sources = {"nvim_lsp"}, symbols = {error = ' ', warn = ' ', info = ' ', hint = ' '} },
'encoding',
'filetype'
},
lualine_y = {'progress'},
lualine_z = {'location'}
},
inactive_sections = {
lualine_a = {},
lualine_b = {},
lualine_c = {'filename'},
lualine_x = {'location'},
lualine_y = {},
lualine_z = {}
},
tabline = {},
extensions = {'fugitive'}
}The result:
Customize tabline
function MyTabLine()
  let s = ''
  for i in range(tabpagenr('$'))
    " select the highlighting
    if i + 1 == tabpagenr()
      let s .= '%#TabLineSel#'
    else
      let s .= '%#TabLine#'
    endif
" set the tab page number (for mouse clicks)
let s .= '%' . (i + 1) . 'T'" the label is made by MyTabLabel()
let s .= ' %{MyTabLabel(' . (i + 1) . ')} 'if i + 1 == tabpagenr()
let s .= '%#TabLineSep#'
elseif i + 2 == tabpagenr()
let s .= '%#TabLineSep2#'
else
let s .= ''
endif
endfor" after the last tab fill with TabLineFill and reset tab page nr
let s .= '%#TabLineFill#%T'" right-align the label to close the current tab page
if tabpagenr('$') > 1
let s .= '%=%#TabLine#%999X'
endifreturn s
endfunctionfunction MyTabLabel(n)
let buflist = tabpagebuflist(a:n)
let winnr = tabpagewinnr(a:n)
let name = bufname(buflist[winnr - 1])
let label = fnamemodify(name, ':t')
return len(label) == 0 ? '[No Name]' : label
endfunctionset tabline=%!MyTabLine()
That’s pretty much it!
I hope it’s helpful for improving your vim environment.
Follow me online
- Check out my app called Inkdrop — A Markdown note-taking app
- Twitter https://twitter.com/inkdrop_app
- Blog https://www.devas.life/
- YouTube https://www.youtube.com/devaslife
- Discord community https://discord.gg/QfsG5Kj
- Instagram https://instagram.com/craftzdog
