Supporting iOS Share Extensions & Android Intents on React Native


Hi, it's Takuya, the solo developer of Inkdrop, a note-taking app designed for software developers. Recently, I enabled a web clipper feature on the mobile app for both iOS and Android. I'd like to share how I implemented the logic to receive a shared URL in React Native.
My mobile app is a 'bare' React Native project (not using Expo), because I started it more than seven years ago—well before Expo was a thing. If you use Expo, check out MaxAst/expo-share-extension.
App Redirection Approach
One challenge for React Native apps is how to display a custom view in an iOS share extension. Because a share extension and its containing app are separate processes, you can’t directly share instances or data, and you need a method of communication, such as storing files in the same App Group. Typically, apps send shared content to their servers, e.g., via REST APIs, and then load it in the containing app upon launch.
However, because Inkdrop uses end-to-end encryption with its servers, supporting that same encryption flow in the share extension would be complicated. Instead, I decided to redirect to the containing app immediately after the user selects Inkdrop from the share sheet. This approach is used by other apps like Bluesky, which is also built with React Native. It appears that Apple permits launching a containing app from a share extension—there’s a Stack Overflow discussion about it.
I also found a promising library called react-native-receive-sharing-intent, which provides a useful guide on setting up a share extension for iOS and handling shared Intents on Android. Instead of installing it, I followed the project setup steps from the documentation and wrote my own native code, because I prefer minimal dependencies and I’m comfortable tweaking native code.
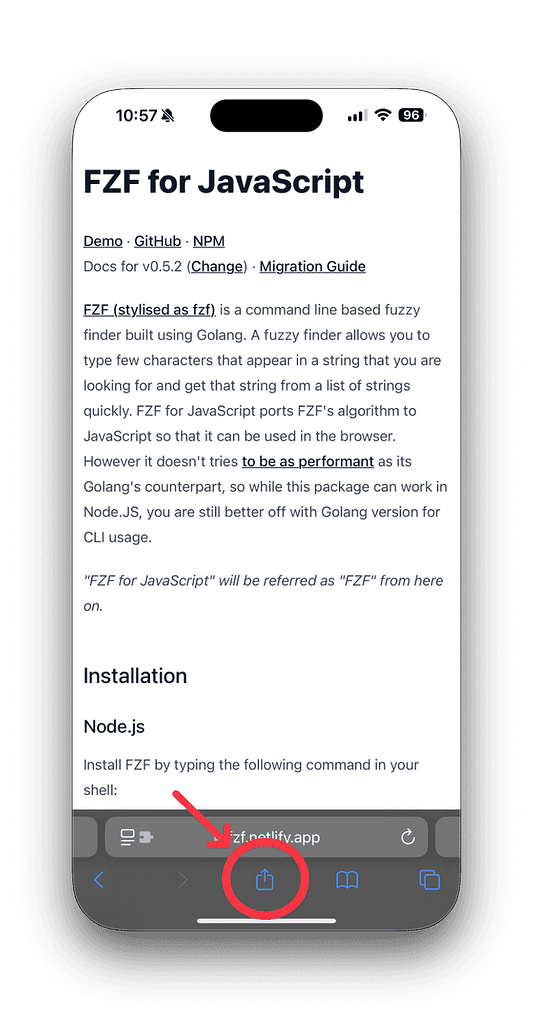
Here is a demo of Inkdrop:
iOS
1. Enable Deep Linking
Edit Info.plist
- Path:
<project_folder>/ios/<project_name>/Info.plist
<key>CFBundleURLTypes</key>
<array>
  <dict>
    <key>CFBundleTypeRole</key>
    <string>Editor</string>
    <key>CFBundleURLName</key>
    <string>app.inkdrop</string>
    <key>CFBundleURLSchemes</key>
    <array>
      <string>inkdrop</string>
    </array>
  </dict>
</array>
Edit <app>.entitlements
- Path:
<project_folder>/ios/<your project name>/<your project name>.entitlements
<dict>
  <key>com.apple.developer.associated-domains</key>
  <array>
    <string>applinks:inkdrop.app</string>
    <string>webcredentials:inkdrop.app</string>
    <string>webcredentials:my.inkdrop.app</string>
  </array>
</dict>
Edit AppDelegate.m
- Path:
<project_folder>/ios/<project_name>/AppDelegate.m
#import <React/RCTLinkingManager.h>

// ...

#pragma mark - Deep linking

- (BOOL)application:(UIApplication *)application
            openURL:(NSURL *)url
            options:(NSDictionary<UIApplicationOpenURLOptionsKey,id> *)options
{
  return [RCTLinkingManager application:application openURL:url options:options];
}
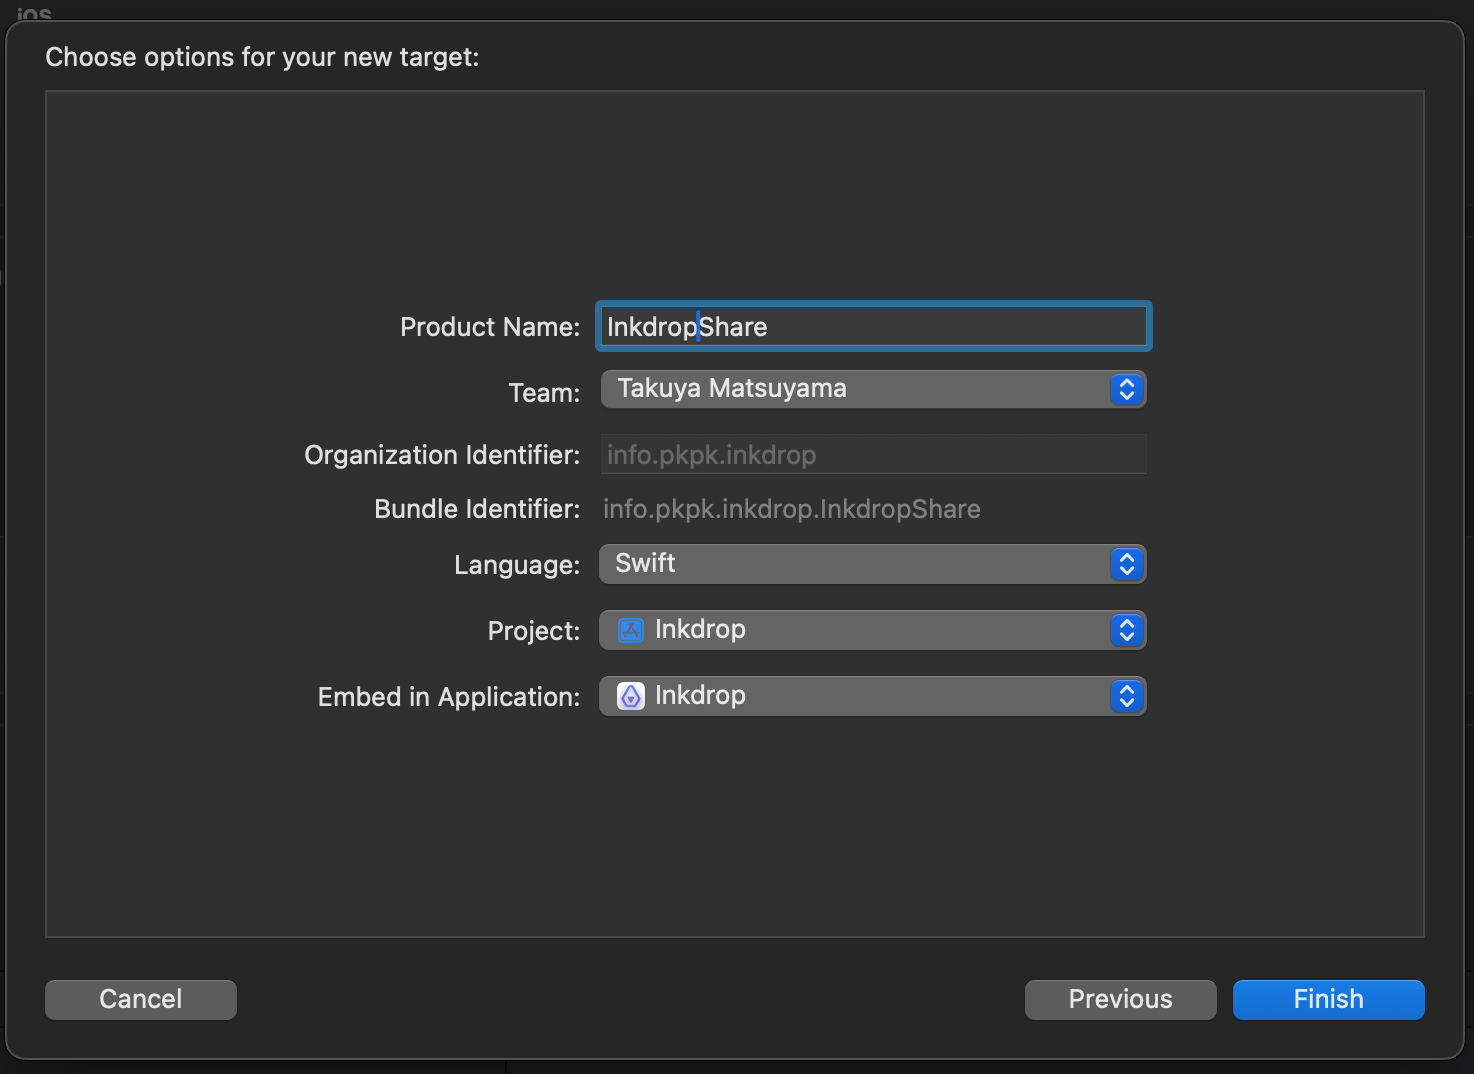
2. Create a Share Extension for iOS
In Xcode, go to File → New → Target..., then choose “Share Extension”. Give it a descriptive name (for example, "InkdropShare")—this name will appear in the share sheet.
3. Edit the Extension’s Info.plist
- Path:
<project_folder>/ios/<Your Share Extension Name>/Info.plist
In my case, the app only accepts URLs, so the Info.plist looks like this:
<?xml version="1.0" encoding="UTF-8"?>
<!DOCTYPE plist PUBLIC "-//Apple//DTD PLIST 1.0//EN"
 "http://www.apple.com/DTDs/PropertyList-1.0.dtd">
<plist version="1.0">
<dict>
  <key>NSExtension</key>
  <dict>
    <key>NSExtensionAttributes</key>
    <dict>
      <key>NSExtensionActivationRule</key>
      <dict>
        <key>NSExtensionActivationSupportsFileWithMaxCount</key>
        <integer>0</integer>
        <key>NSExtensionActivationSupportsImageWithMaxCount</key>
        <integer>0</integer>
        <key>NSExtensionActivationSupportsMovieWithMaxCount</key>
        <integer>0</integer>
        <key>NSExtensionActivationSupportsWebURLWithMaxCount</key>
        <integer>1</integer>
      </dict>
    </dict>
    <key>NSExtensionPointIdentifier</key>
    <string>com.apple.share-services</string>
    <key>NSExtensionPrincipalClass</key>
    <string>$(PRODUCT_MODULE_NAME).ShareViewController</string>
  </dict>
</dict>
</plist>
4. Implement ShareViewController.swift
After creating the extension, you should see its icon in the iOS share sheet.
Xcode automatically creates a Swift file for the view controller (ShareViewController). This class is loaded by the share extension. To redirect to the containing app, I tested a snippet from the documentation, but it didn’t work. I ended up referring to Bluesky’s implementation and adapted the code:
//
//  ShareViewController.swift
//  InkdropShare
//
//  Created by Takuya Matsuyama on 2025/01/30.
//

import UIKit

class ShareViewController: UIViewController {

  override func viewDidAppear(_ animated: Bool) {
    super.viewDidAppear(animated)
    handleShared()
  }

  private func handleShared() {
    guard let extensionItem = extensionContext?.inputItems.first as? NSExtensionItem,
          let itemProvider = extensionItem.attachments?.first
    else {
      self.completeRequest()
      return
    }

    if itemProvider.hasItemConformingToTypeIdentifier("public.url") {
      itemProvider.loadItem(forTypeIdentifier: "public.url", options: nil) { (urlItem, error) in
        if let shareURL = urlItem as? URL {
          let encodedURL = shareURL.absoluteString
            .addingPercentEncoding(withAllowedCharacters: .urlQueryAllowed) ?? ""
          let schemeStr = "inkdrop://actions/save-link?url=\(encodedURL)"

          if let schemeURL = URL(string: schemeStr) {
            self.openURL(schemeURL)
            self.completeRequest()
          } else {
            self.completeRequest()
          }
        } else {
          self.completeRequest()
        }
      }
    } else {
      self.completeRequest()
    }
  }

  private func completeRequest() {
    self.extensionContext?.completeRequest(returningItems: nil, completionHandler: nil)
  }

  @objc func openURL(_ url: URL) -> Bool {
    var responder: UIResponder? = self
    while responder != nil {
      if let application = responder as? UIApplication {
        application.open(url)
        return true
      }
      responder = responder?.next
    }
    return false
  }
}
This code opens a deep link to the main app with the URI inkdrop://actions/save-link?url=encodedURL.
5. Handle Deep Linking in React Native
React Native has built-in support for deep linking:
For example:
import React, { useEffect } from 'react'
import { Linking } from 'react-native';

function App() {
  useEffect(() => {
    // Check initial URL
    Linking.getInitialURL().then((url) => {
      // handle URL on launch
    });

    // Subscribe to any new links
    const subscription = Linking.addEventListener('url', ({ url }) => {
      // handle inbound URL
    });

    return () => {
      subscription.remove();
    };
  }, []);

  return null;
}
Android
Android uses a concept called Intents to communicate between apps. If you have native Android experience, you’ll be familiar with it. Here, you’ll make your app capable of receiving shared URLs via Intents. Deep linking is not required to handle incoming Intents.
1. Edit AndroidManifest.xml
- Path:
<Project_folder>/android/app/src/main/AndroidManifest.xml
Add an <intent-filter> in your manifest to tell Android your app can accept text data from other apps:
<intent-filter>
  <action android:name="android.intent.action.SEND" />
  <category android:name="android.intent.category.DEFAULT" />
  <data android:mimeType="text/*" />
</intent-filter>
2. React Native Doesn’t Handle ACTION_SEND by Default
The library react-native-receive-sharing-intent uses deep linking to detect incoming Intents, but this approach didn’t work in my project. The React Native Linking module doesn’t emit a url event for android.intent.action.SEND. Inside ReactInstanceManager, you can see that it only handles VIEW or NDEF_DISCOVERED.
@ThreadConfined("UI")
public void onNewIntent(Intent intent) {
    UiThreadUtil.assertOnUiThread();
    ReactContext currentContext = this.getCurrentReactContext();
    if (currentContext == null) {
        FLog.w(TAG, "Instance detached from instance manager");
    } else {
        String action = intent.getAction();
        Uri uri = intent.getData();
        if (uri != null && ("android.intent.action.VIEW".equals(action)
           || "android.nfc.action.NDEF_DISCOVERED".equals(action))) {
            DeviceEventManagerModule deviceEventManagerModule =
                (DeviceEventManagerModule)currentContext.getNativeModule(DeviceEventManagerModule.class);
            if (deviceEventManagerModule != null) {
                deviceEventManagerModule.emitNewIntentReceived(uri);
            }
        }

        currentContext.onNewIntent(this.mCurrentActivity, intent);
    }
}
3. Handle Received Intents Manually
You can manually detect ACTION_SEND in Kotlin (or Java) and pass the data to React Native.
- Path:
<Project_folder>/android/app/src/main/java/com/YOUR_APP/MainActivity.kt
override fun onNewIntent(intent: Intent?) {
    var handledIntent = false

    if (intent != null) {
        val mimeType = intent.type
        if (mimeType != null && mimeType.startsWith("text/plain")) {
            if (intent.action == Intent.ACTION_SEND) {
                val sharedText = intent.getStringExtra(Intent.EXTRA_TEXT) ?: ""
                val reactContext = this.reactInstanceManager.currentReactContext
                if (reactContext != null) {
                    val eventEmitter = reactContext
                        .getJSModule(DeviceEventManagerModule.RCTDeviceEventEmitter::class.java)
                    eventEmitter.emit("Android-ShareReceived", sharedText)
                    handledIntent = true
                }
            }
        }
    }

    if (!handledIntent) {
        super.onNewIntent(intent)
        setIntent(intent)
    }
}
Here, DeviceEventManagerModule.RCTDeviceEventEmitter lets you emit custom events to the JavaScript side. Once the event is dispatched, you can listen for it in your React code.
4. Handle Received Data in React
Create a small module for listening to the custom event:
import {
  EmitterSubscription,
  NativeEventEmitter,
  NativeModules
} from 'react-native';

const { DeviceEventManagerModule } = NativeModules;
const eventEmitter = new NativeEventEmitter(DeviceEventManagerModule);

export function addShareReceivedListener(
  callback: (sharedText: string) => void
): EmitterSubscription {
  return eventEmitter.addListener('Android-ShareReceived', callback);
}
Then, in your app:
import { addShareReceivedListener } from './ShareIntentModule';

addShareReceivedListener((url: string) => {
  if (url.startsWith('https://')) {
    // do something
  }
});
That’s the gist of how I added a share extension on iOS and handled ACTION_SEND on Android for my React Native app. I hope you find it helpful!
Check out my app if you're looking for a Markdown note-taking app :)